改进飞碟(Hit UFO)游戏:
- 游戏内容要求:
- 按 adapter 模式设计图修改飞碟游戏
- 使它同时支持物理运动与运动学(变换)运动
适配器(adapter)模式
在上一版游戏的基础上,我们希望加入飞碟的物理运动,使游戏能在运动学运动和物理运动这两种模式下运行。为了重用代码,我们需要增加一个适配器,来完成从通用接口(飞碟运动)到两个不同的类(物理运动和运动学运动)的转换。在这里,我采用了对象的适配器模式,在适配器中包含两个不同类的实例,来完成特定飞碟运动接口的转换。
实现思路
实现物理运动
参考运动学飞行的实现方式,定义一个物理运动的类 PhysicsAction,实现飞碟的物理运动。在 Start() 方法中,用 Rigidbody 组件设定初速度并添加重力,模拟物理运动。由于需要处理 Rigidbody 的物理运动,这里应使用FixedUpdate()方法进行更新,防止受到游戏帧率的影响。
1 | /// PhysicsAction.cs |
为了能够重写上面的 FixedUpdate() 方法,需要在 Action 类中添加方法原型:1
2
3
4/// Action.cs
public virtual void FixedUpdate() {
throw new System.NotImplementedException();
}
同时,还需要在 ActionManager 中添加 FixedUpdate() 方法,来调用 Action 的 FixedUpdate() 方法:1
2
3
4
5
6
7
8
9
10
11
12
13
14
15
16
17
18
19
20
21
22/// ActionManager.cs
public void FixedUpdate() {
foreach (Action action in waitingAdd) {
actions[action.GetInstanceID()] = action;
}
waitingAdd.Clear();
foreach (KeyValuePair<int, Action> kv in actions) {
Action action = kv.Value;
if (action.enable) {
action.FixedUpdate(); // fix update action
}
else if (action.destroy) {
waitingDelete.Add(action.GetInstanceID()); // release action
}
}
foreach (int key in waitingDelete) {
Action action = actions[key];
actions.Remove(key);
DestroyObject(action);
}
waitingDelete.Clear();
}
定义物理运动的管理器
参考 FlyActionManager,定义物理运动的管理器,来管理和执行物理运动。1
2
3
4
5
6
7
8
9
10
11
12
13
14/// PhysicsActionManager.cs
public class PhysicsActionManager : ActionManager, ActionCallback {
public PhysicsAction physics; // 物理动作
// 管理飞行
public void Fly(GameObject disk, float angle, float power) {
physics = PhysicsAction.GetAction(disk.GetComponent<DiskData>().direction, angle, power);
this.RunAction(disk, physics, this);
}
public void ActionEvent(Action source, ActionEventType events = ActionEventType.Completed,
int intParam = 0, string strParam = null, object objectParam = null) { }
}
修改原有的飞行运动管理器
删除飞行管理器中的 SceneController 实例。实现方法与上面的物理运动管理器类似。1
2
3
4
5
6
7
8
9
10
11
12
13
14/// FlyActionManager.cs
public class FlyActionManager : ActionManager, ActionCallback {
public FlyAction fly; // 飞行动作
// 管理飞行
public void Fly (GameObject disk, float angle, float power) {
fly = FlyAction.GetAction(disk.GetComponent<DiskData>().direction, angle, power);
this.RunAction(disk, fly, this);
}
public void ActionEvent(Action source, ActionEventType events = ActionEventType.Completed,
int intParam = 0, string strParam = null, object objectParam = null) { }
}
定义通用接口
添加一个飞碟运动管理的通用接口。适配器继承这个接口来进行运动的适配。1
2
3
4/// Interfaces.cs
public interface IActionManager {
void Fly(GameObject disk, float angle, float power, bool physics);
}
实现适配器
适配器中包含两个运动管理器的实例,根据变量 physics 来调用不同的运动管理器,实现不同的运动模式。1
2
3
4
5
6
7
8
9
10
11
12
13
14
15
16
17
18
19
20
21
22/// ActionManagerAdapter.cs
public class ActionManagerAdapter : MonoBehaviour, IActionManager {
public FlyActionManager flyActionManager;
public PhysicsActionManager physicsActionManager;
public void Start() {
flyActionManager = (FlyActionManager)gameObject.AddComponent<FlyActionManager>();
physicsActionManager = (PhysicsActionManager)gameObject.AddComponent<PhysicsActionManager>();
}
public void Fly(GameObject disk, float angle, float power, bool physics) {
// 物理运动
if (physics) {
physicsActionManager.Fly(disk, angle, power);
}
// 运动学运动
else {
flyActionManager.Fly(disk, angle, power);
}
}
}
修改 FirstSceneController
- 将原有的 FlyActionManager 实例修改为 ActionManagerAdapter 实例;
- 修改 ThrowDisk() 方法,调用通用接口提供的 Fly 方法,利用 physics 变量来控制不同的运动模式;
- 修改 Pause() 和 Begin() 方法,利用 Time.timeScale 实现物理运动的暂停(可恢复)。
1 | /// FirstSceneController.cs |
游戏运行方法
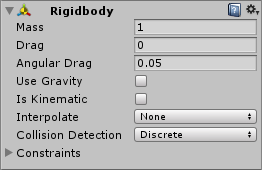
- 在飞碟预制上添加 Rigidbody 组件,取消勾选重力(运动学运动不需要重力);

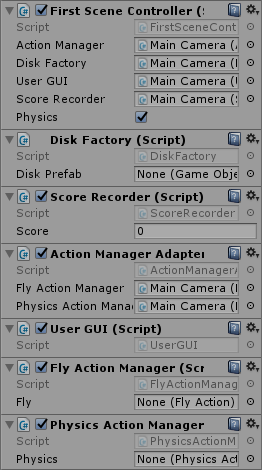
- 将 FirstSceneController.cs、DiskFactory.cs 和 ScoreRecorder.cs 挂在 Main Camera 上,利用 First Scene Controller 的 Physics 属性控制运动模式。运行后结果:

游戏视频
项目地址
参考博客
[1] Unity3d 学习之路 - 简单打飞碟 (适配器模式).
[3] Unity3D 学习笔记(6)– 打飞碟游戏改进版 .
返回 Unity 3D Learning